Heel & Foot / READ
How to Tape Your Foot for Plantar Fasciitis, Step by Step
Podiatrist Dan Broadhead shows how to strap the foot for plantar fasciitis with rigid zinc oxide tape, plus aftercare and when to get checked.
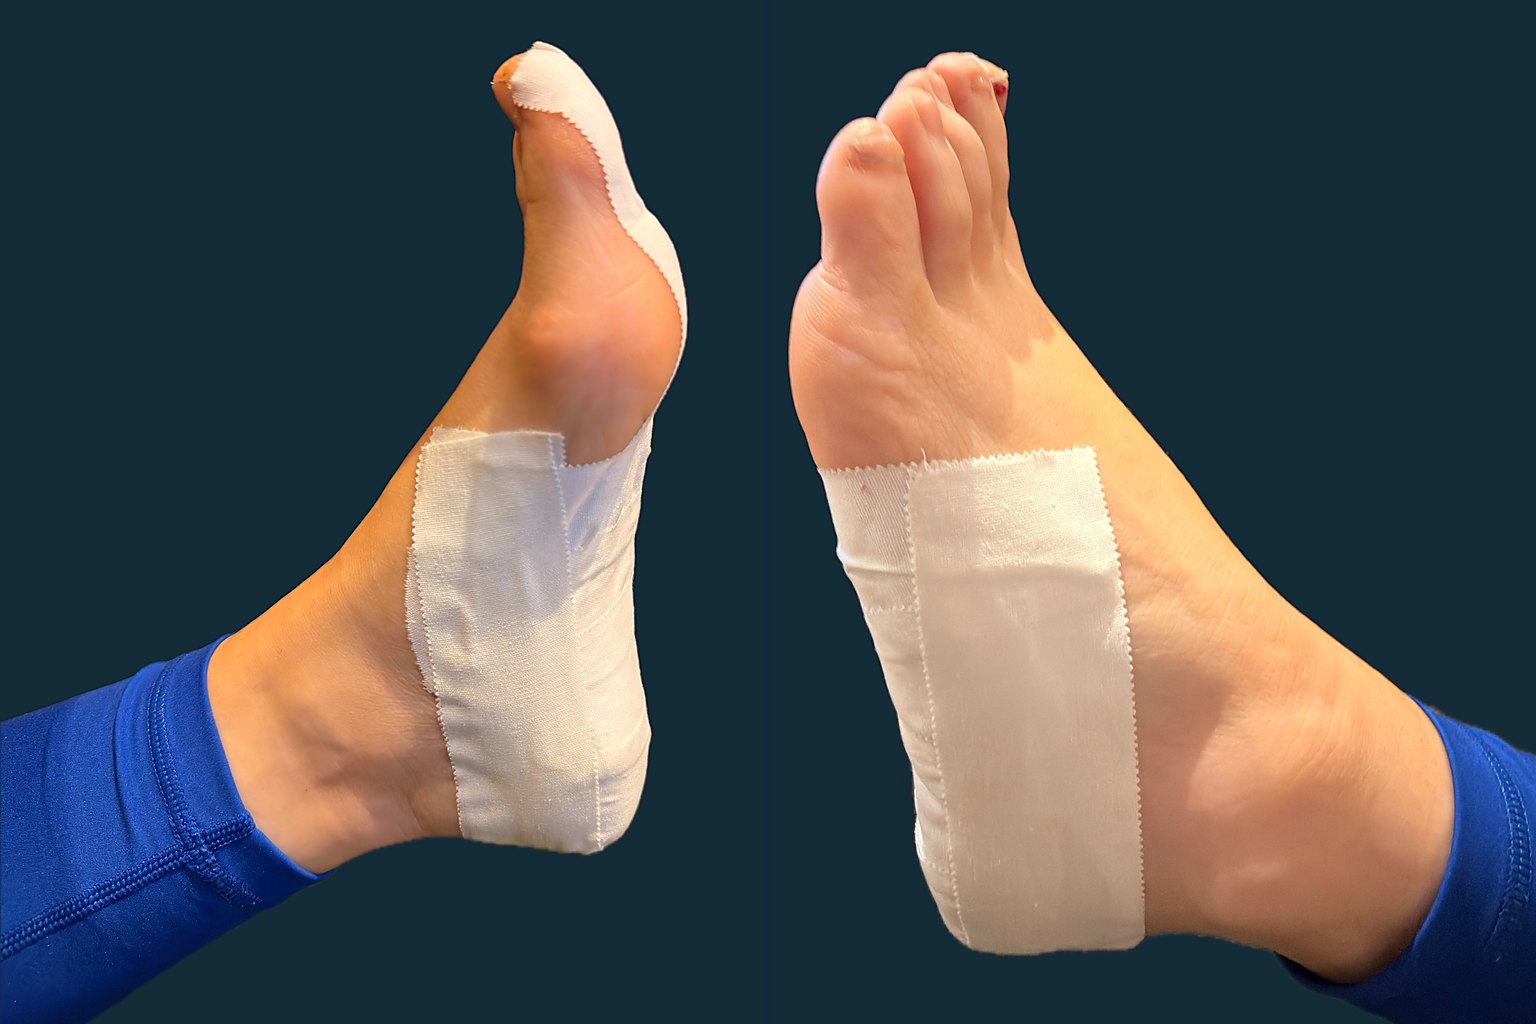
In clinic, I use rigid zinc oxide tape as a short-term support for sore heels. Taping may help reduce pain in the short term when it is used alongside exercises, footwear advice and a treatment plan. [1] This is the method I use, shown step by step.
This article contains affiliate links to the tape I use. If you buy through those links, I may earn a commission. That does not change the price you pay. Those links are advertising, and each one is marked (Ad). You do not need to buy a particular brand to follow this guide, and similar rigid zinc oxide tapes from other brands are fine. I also teach on workshops sponsored by Formthotics, an orthotics company; they have had no input into this article and none of their products is linked.
This is general information, not a diagnosis or personal medical advice. Ask a clinician to demonstrate the technique if you are unsure about positioning or tension.
What you need
- Rigid zinc oxide sports tape
- Scissors
- A clean towel
Use the tape type and width recommended for your foot. The tape linked below is the rigid zinc oxide tape I use: SPORTTAPE, in a 5cm width. It also comes in a 3.8cm width if that is what has been recommended for you.
As an Amazon Associate I earn from qualifying purchases.
WHERE TO BUY
SPORTTAPE 5cm zinc oxide tape, single 10m roll
View on Amazon (Ad)Same 5cm tape in a 3-roll pack
View on Amazon (Ad)Same 5cm tape in a 24-roll pack
View on Amazon (Ad)Same tape in a 3.8cm width, single 10m roll
View on Amazon (Ad)3.8cm tape in a 3-roll pack
View on Amazon (Ad)3.8cm tape in a 24-roll pack
View on Amazon (Ad)Affiliate links: I may earn a commission if you buy, at no extra cost to you. As an Amazon Associate I earn from qualifying purchases.
Before you begin
Wash and thoroughly dry the foot. Avoid moisturiser immediately before taping. Sit comfortably with the sole accessible. [2]
Check the skin
Do not tape over broken or irritated skin, or use an adhesive you know you react to. Ask your podiatrist first if you have reduced sensation, poor circulation, fragile skin or significant swelling. [3]
How to use this guide
Follow Steps 1 to 6 in order. The photographs keep their original numbers, so the finishing views appear as Photo 10 (inside), then Photo 9 (outside). Photos 1 and 2 show the same anchor strip from both sides.
Step 1: Apply the heel anchor
One continuous strip, shown from both sides.
Lift the foot off the ground. Start beside the big toe, run the tape along the inside of the foot, around the back of the heel and along the outside, finishing just before the base of the little toe.
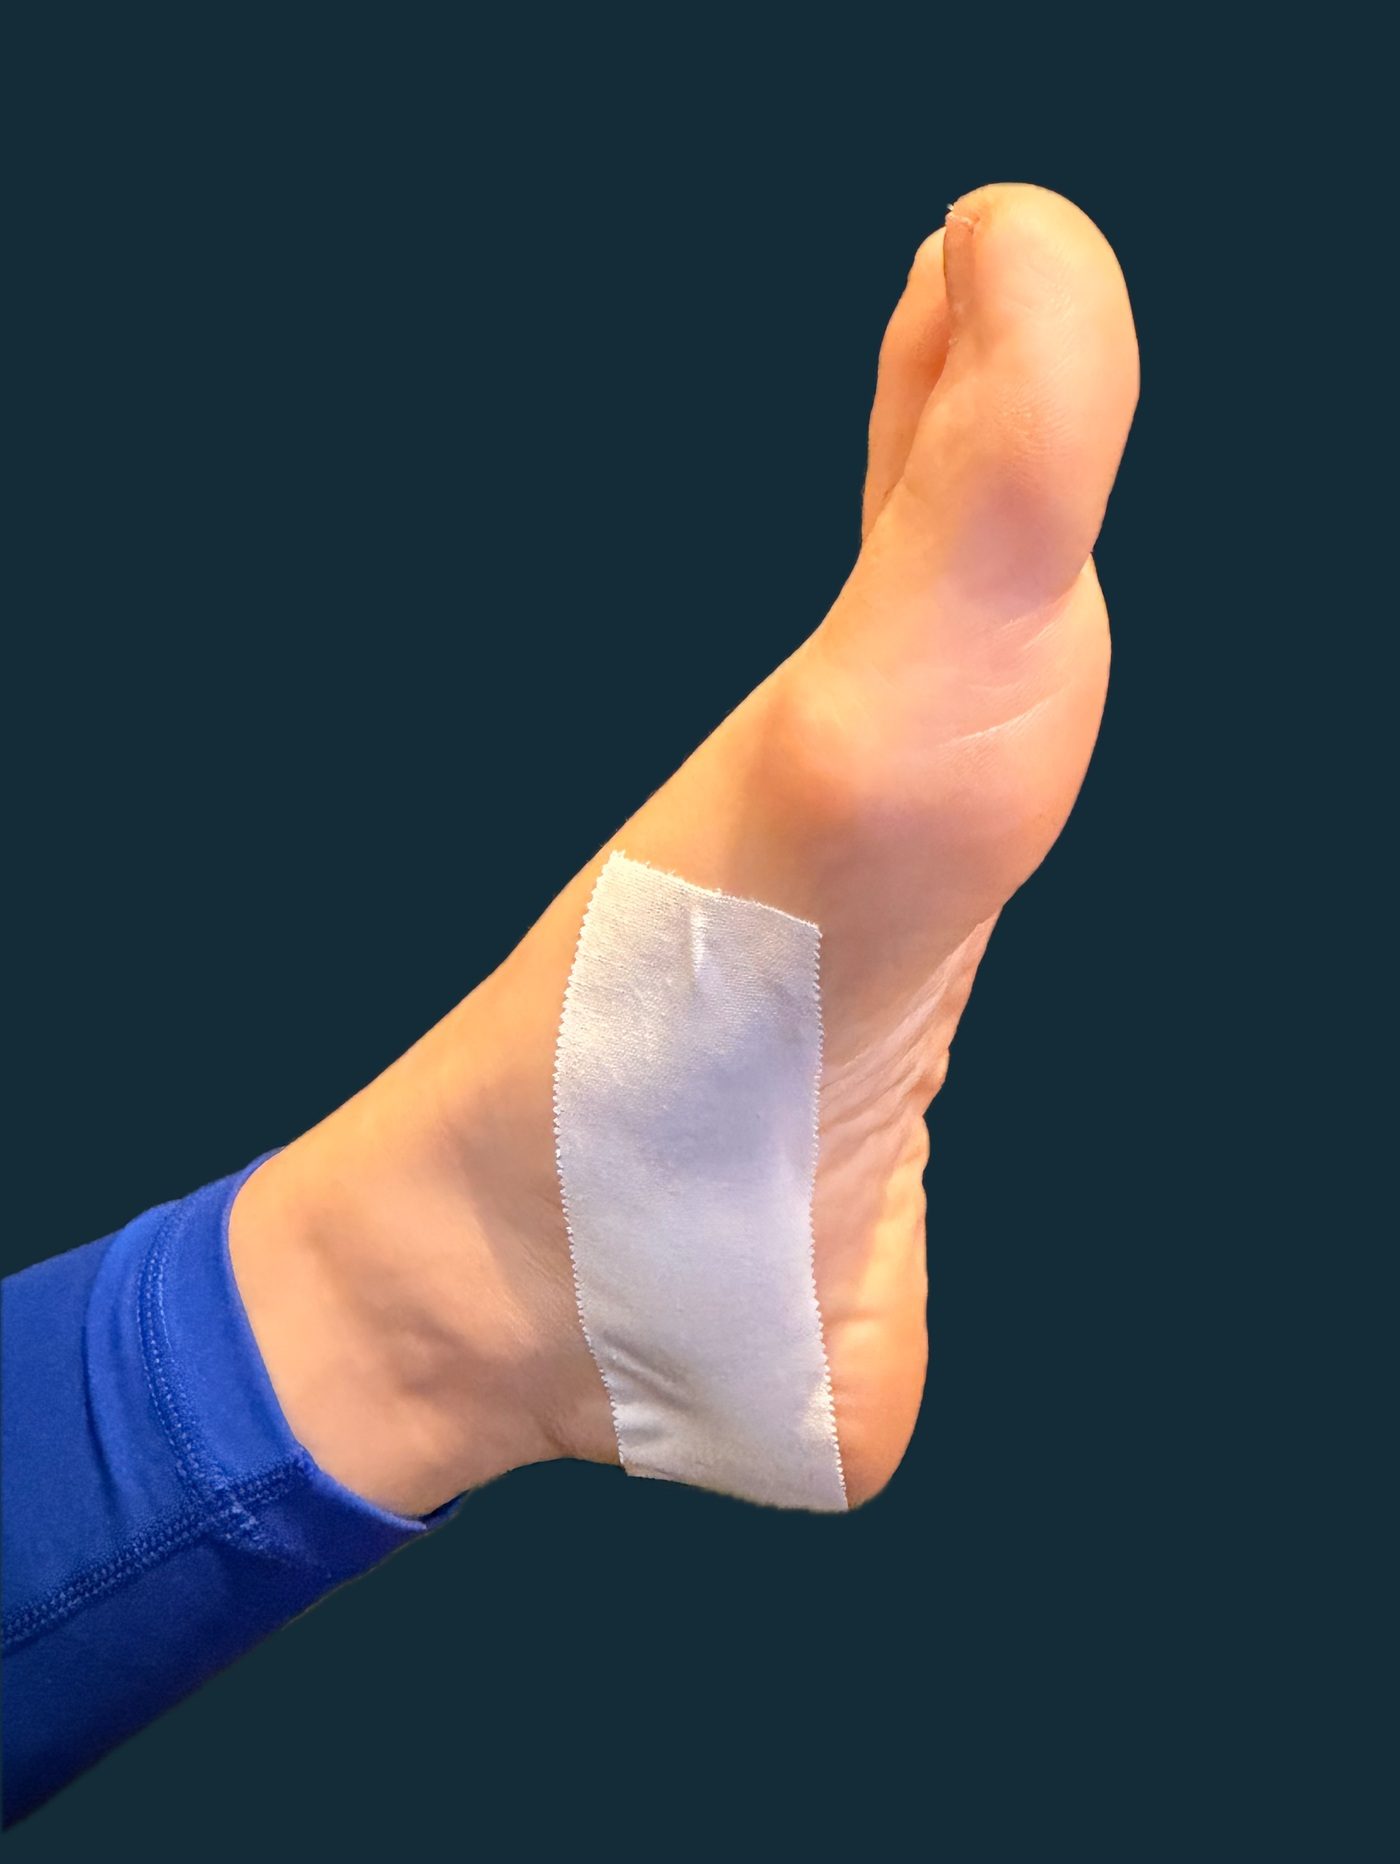
Photo 1. The heel anchor, seen from the inside.
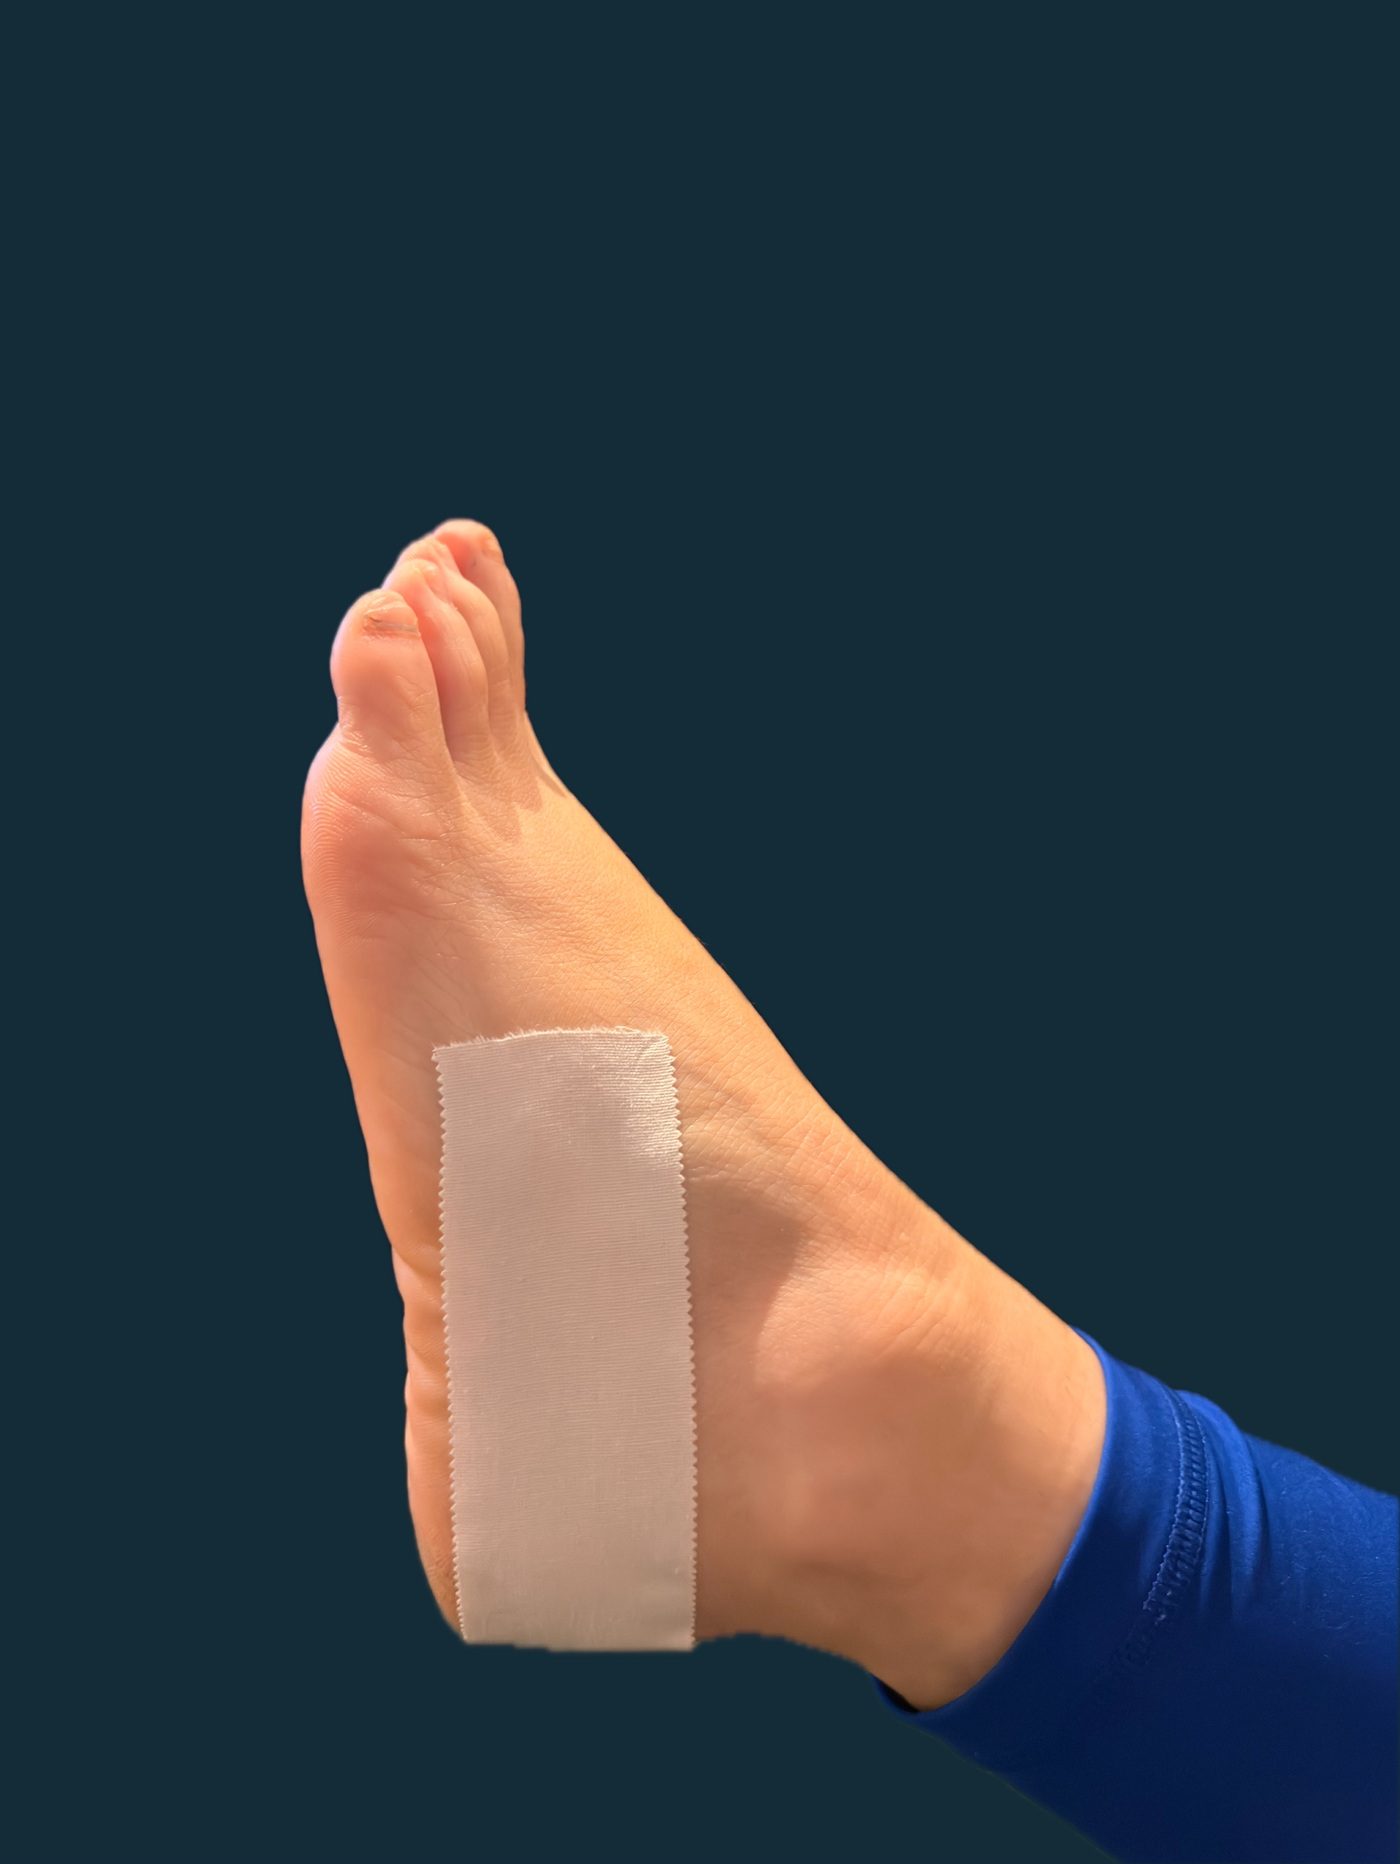
Photo 2. The same anchor strip, seen from the outside.
Check before moving on
Keep the strip low around the heel, parallel to the sole. Use only enough tension to lay the non-stretch tape flat without creases; do not pull it tight around the foot.
Step 2: Apply the main support strip
Keep the big toe bent upwards while attaching the strip.
Bend the big toe upwards (dorsiflex it). Attach the starting end of the tape to the underside of the big toe, not over its tip.
Keep the toe bent upwards and pull the strip taut along the underside of the big-toe joint towards the heel.
Secure it at the heel onto the anchor strip from Step 1.
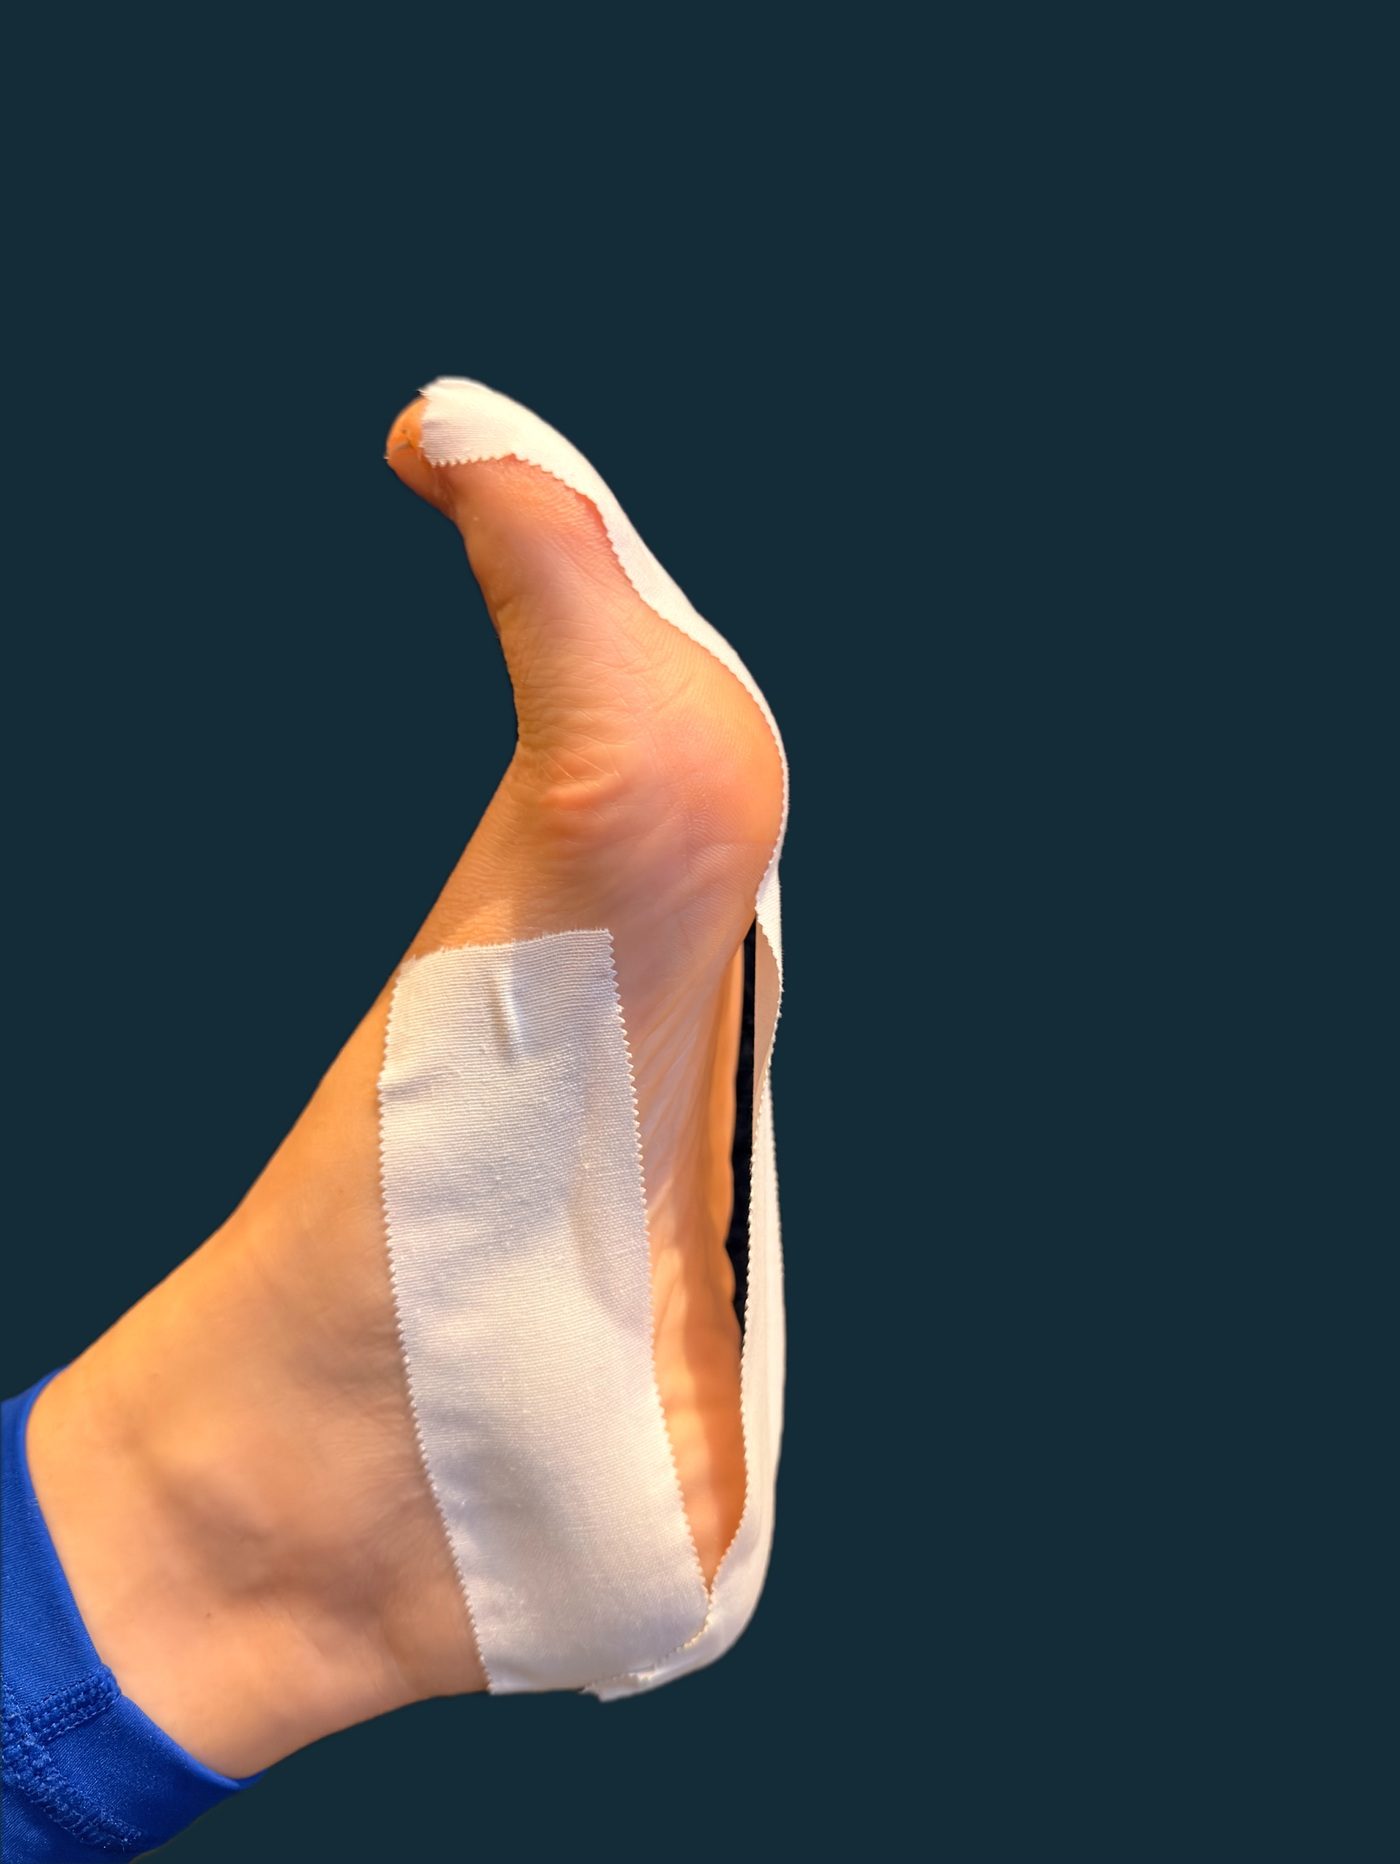
Photo 3. The main support strip, with a gap still visible beneath the arch.
Key point
Leave a gap between the tape and the arch at this stage. The strip bridges from the big toe to the heel. Do not press it into the arch yet or force the toe beyond a comfortable position.
Step 3: Relax the toe and mould
Let the slack settle into the shape of the arch.
Allow the big toe to relax so it is no longer bent upwards. This makes the tape beneath the foot loose.
Gently mould and smooth this slack into the arch until the strip follows the contours of the foot.
Keep the toe and heel ends attached while smoothing.
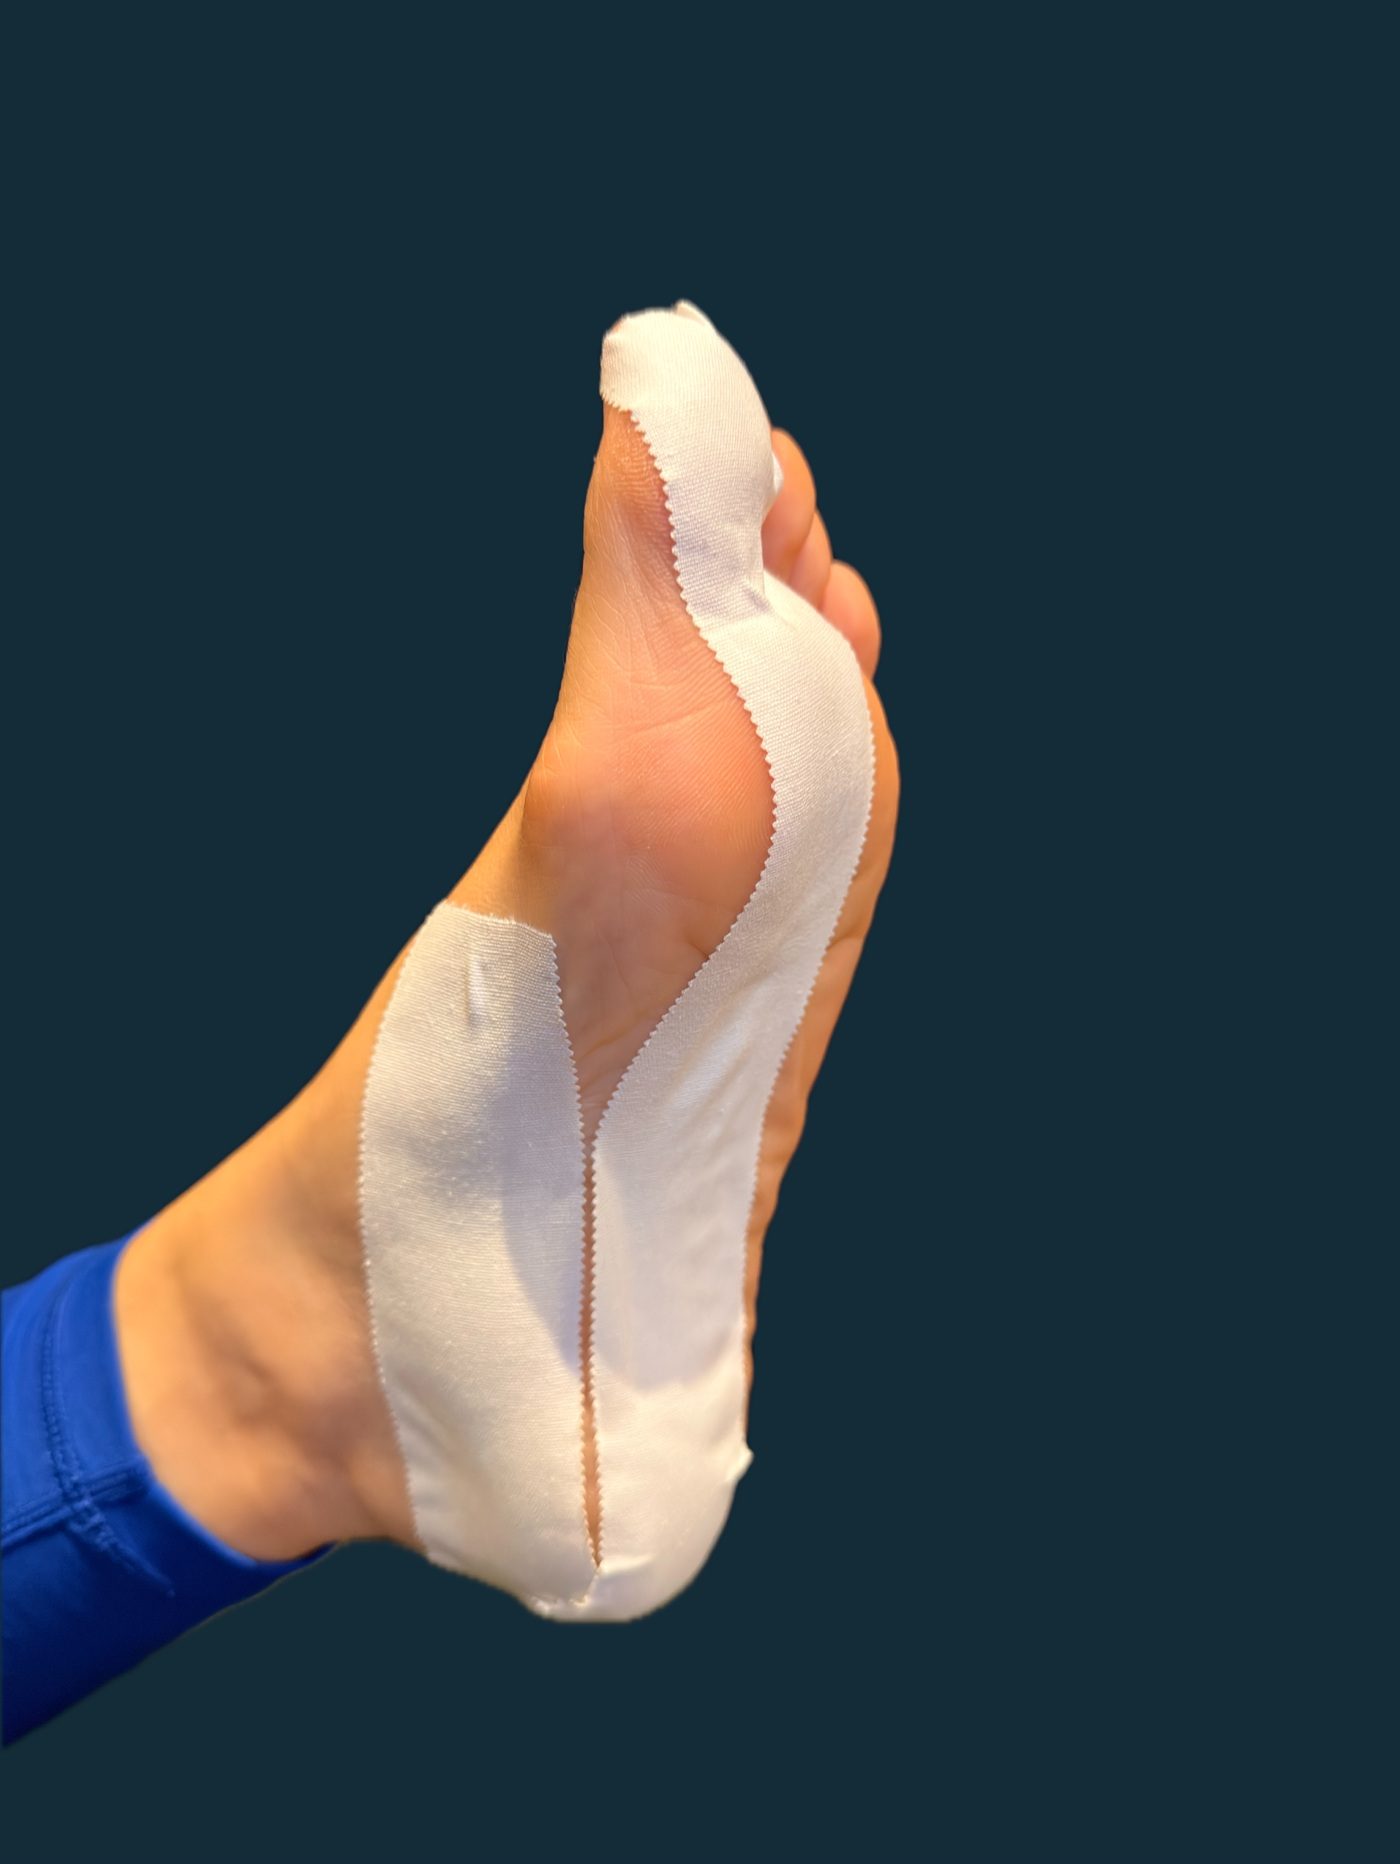
Photo 4. Once the toe is relaxed, the tape is smoothed so it follows the arch.
Key point
The sequence matters: first attach the taut strip with the toe bent upwards; then relax the toe and gently smooth the slack into the arch.
Step 4: Secure the long strip
Cross strips hold the toe-to-heel strip against the foot.
Start just behind the ball of the foot. Apply a strip from the original anchor on the inside (medial side), across the sole, to the outside (lateral side). Add the next strip towards the heel, overlapping by 25-50%.
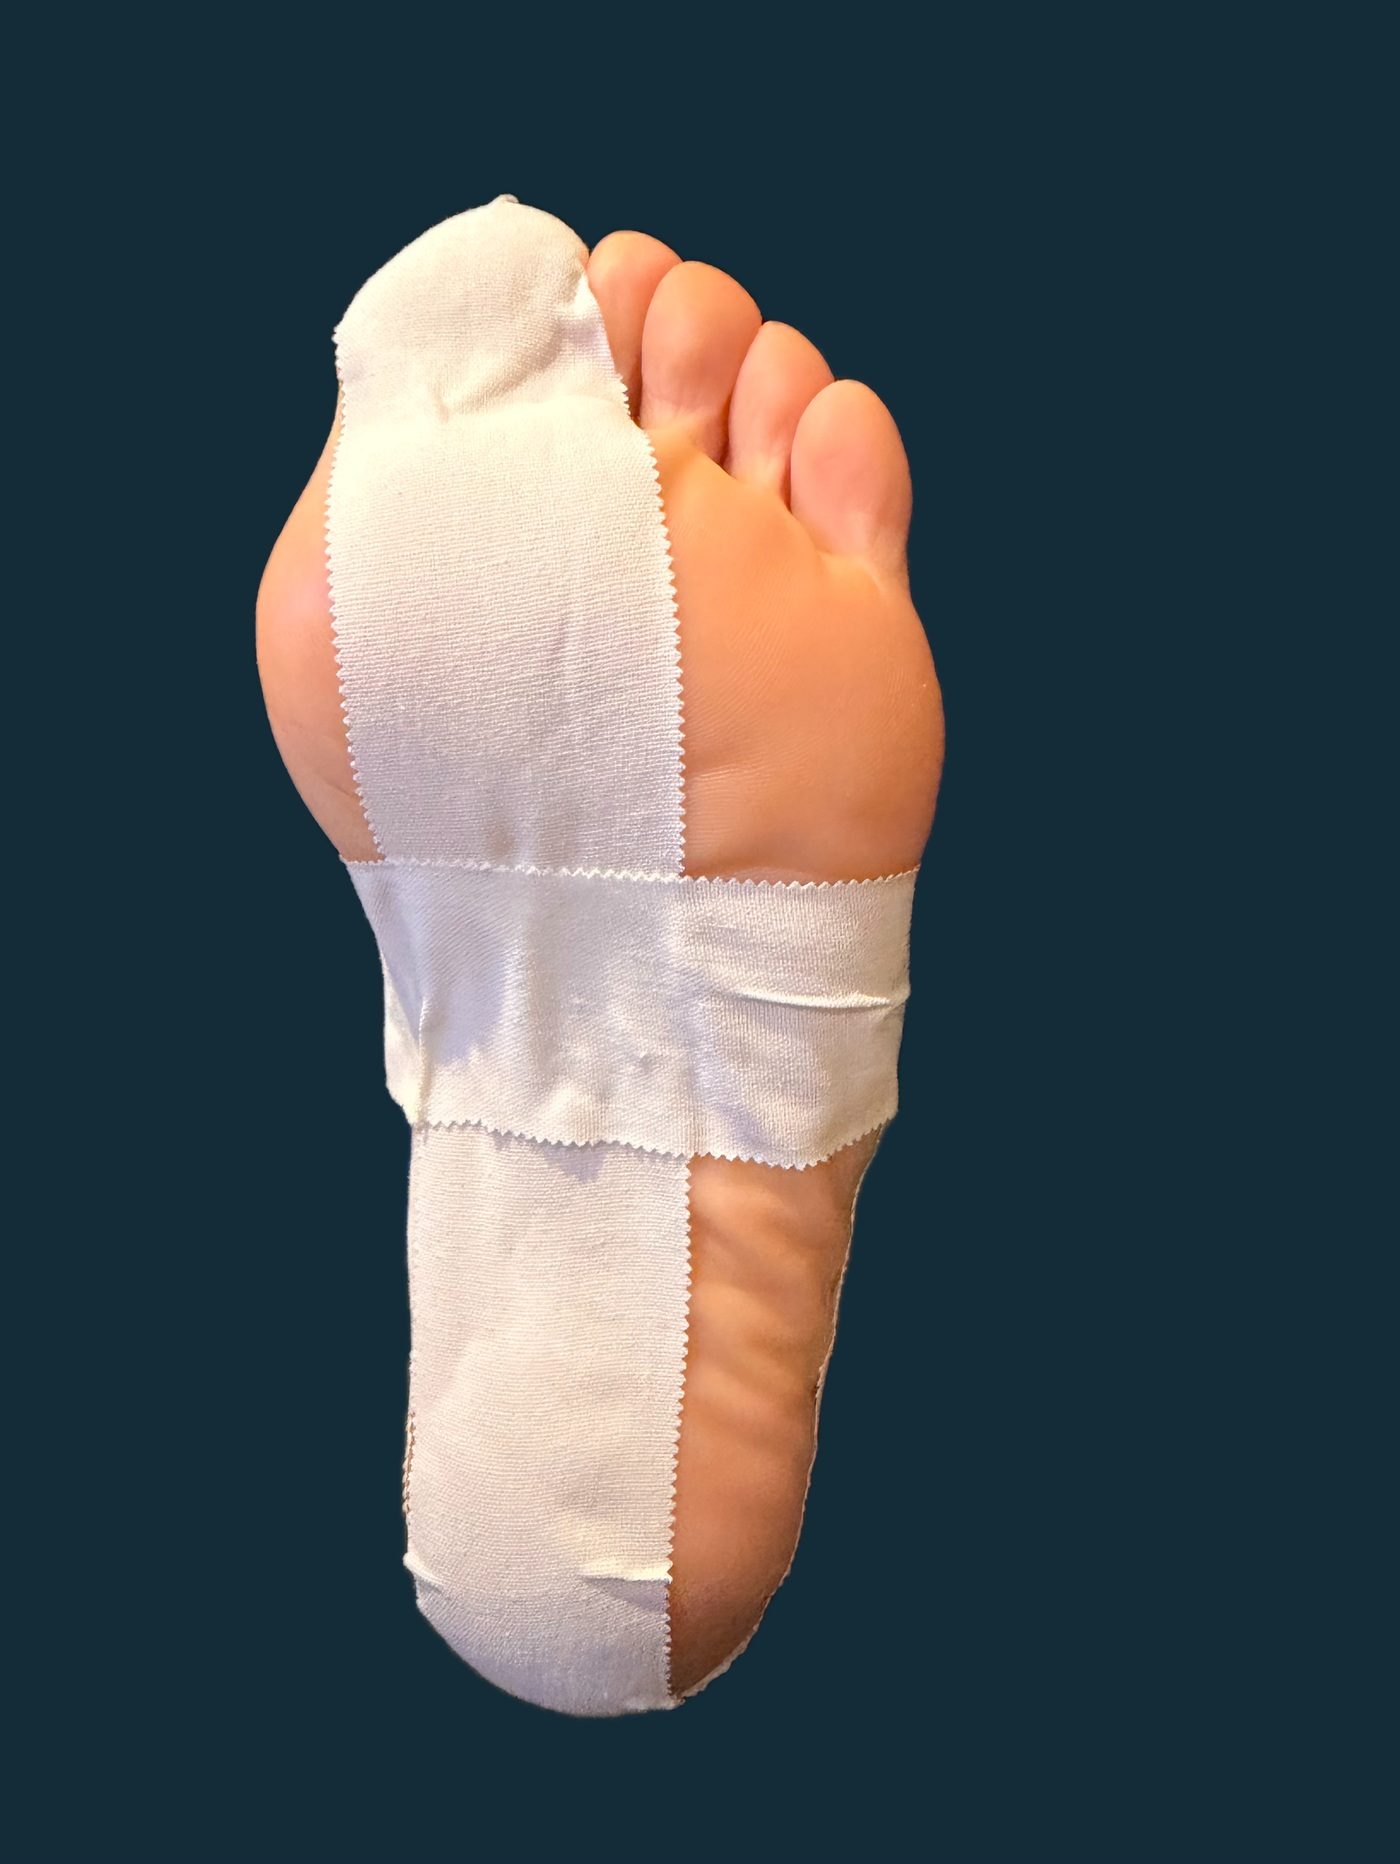
Photo 5. The first cross strip, just behind the ball of the foot.
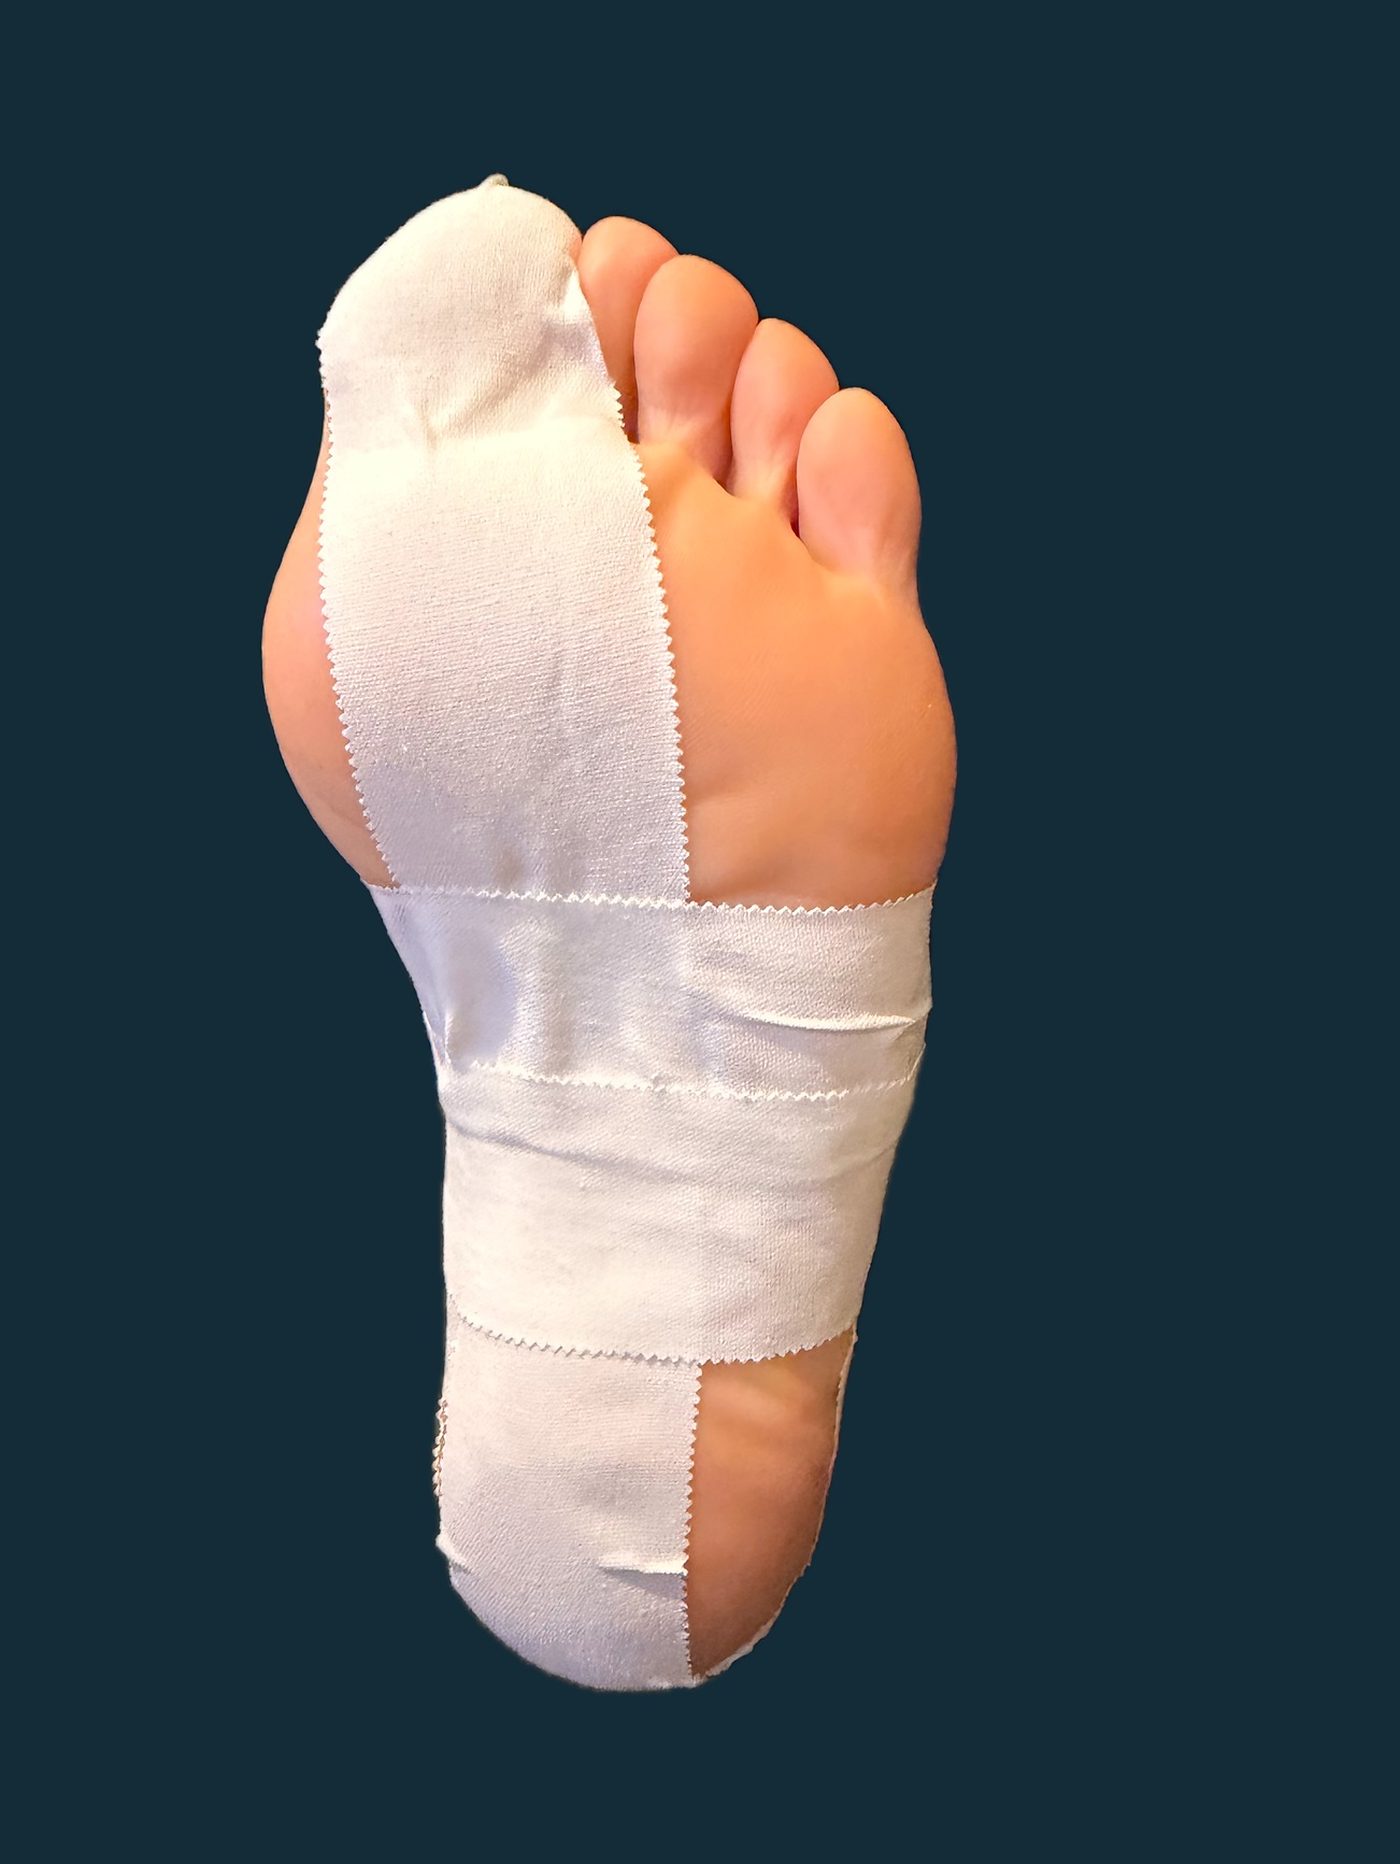
Photo 6. The next strip overlaps the first as you work towards the heel.
Check before moving on
Apply each strip inside to outside, using only enough tension to lie flat without creases. These strips secure the long support strip; do not pull them tight around the foot.
Continue adding strips from inside to outside, overlapping each by 25-50%, until the underside of the foot is covered as shown. Smooth each strip before adding the next.
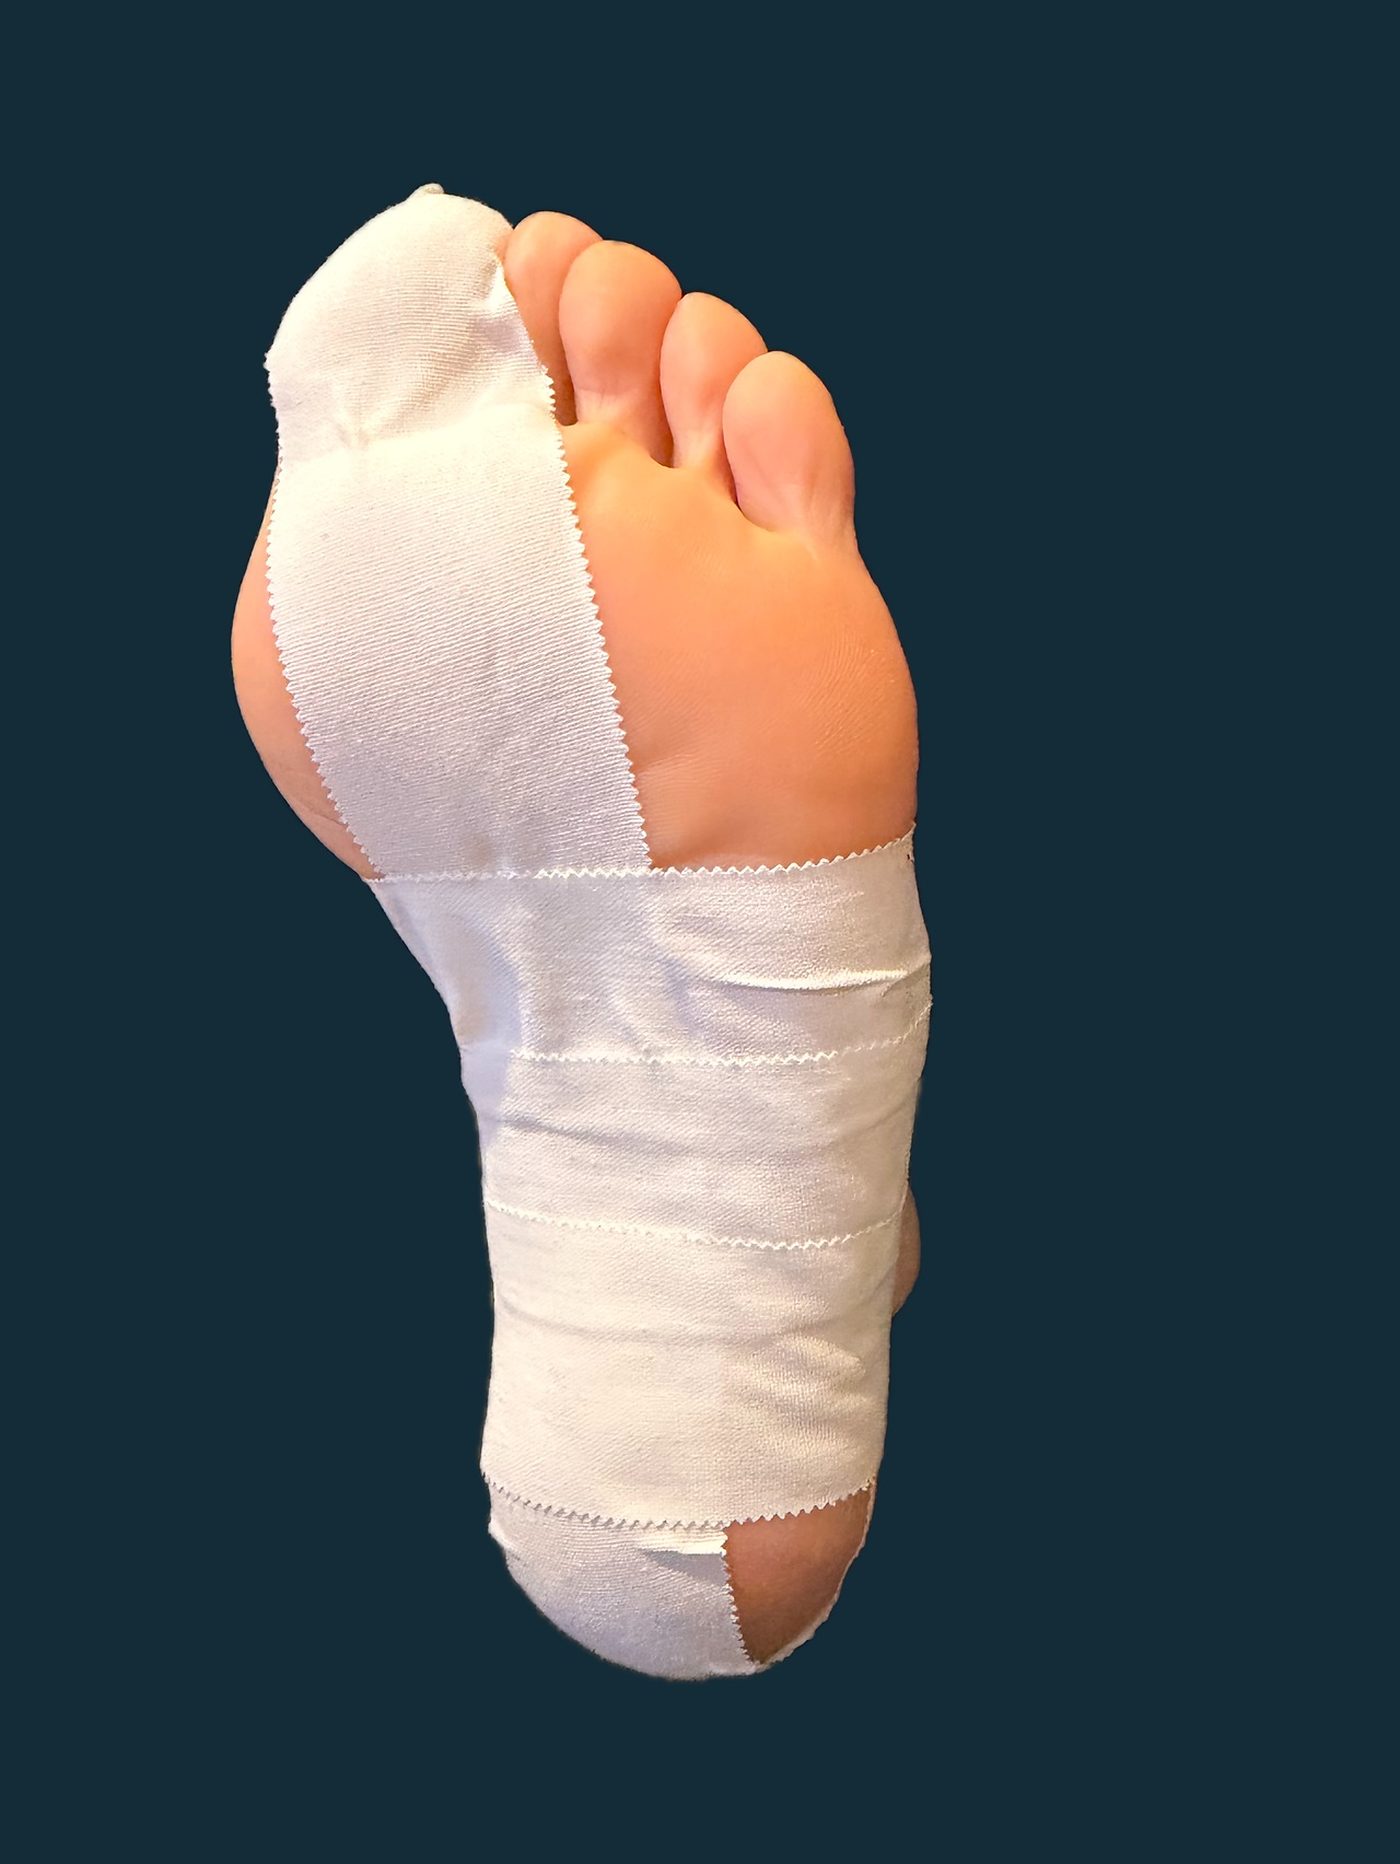
Photo 7. Coverage progresses towards the heel.
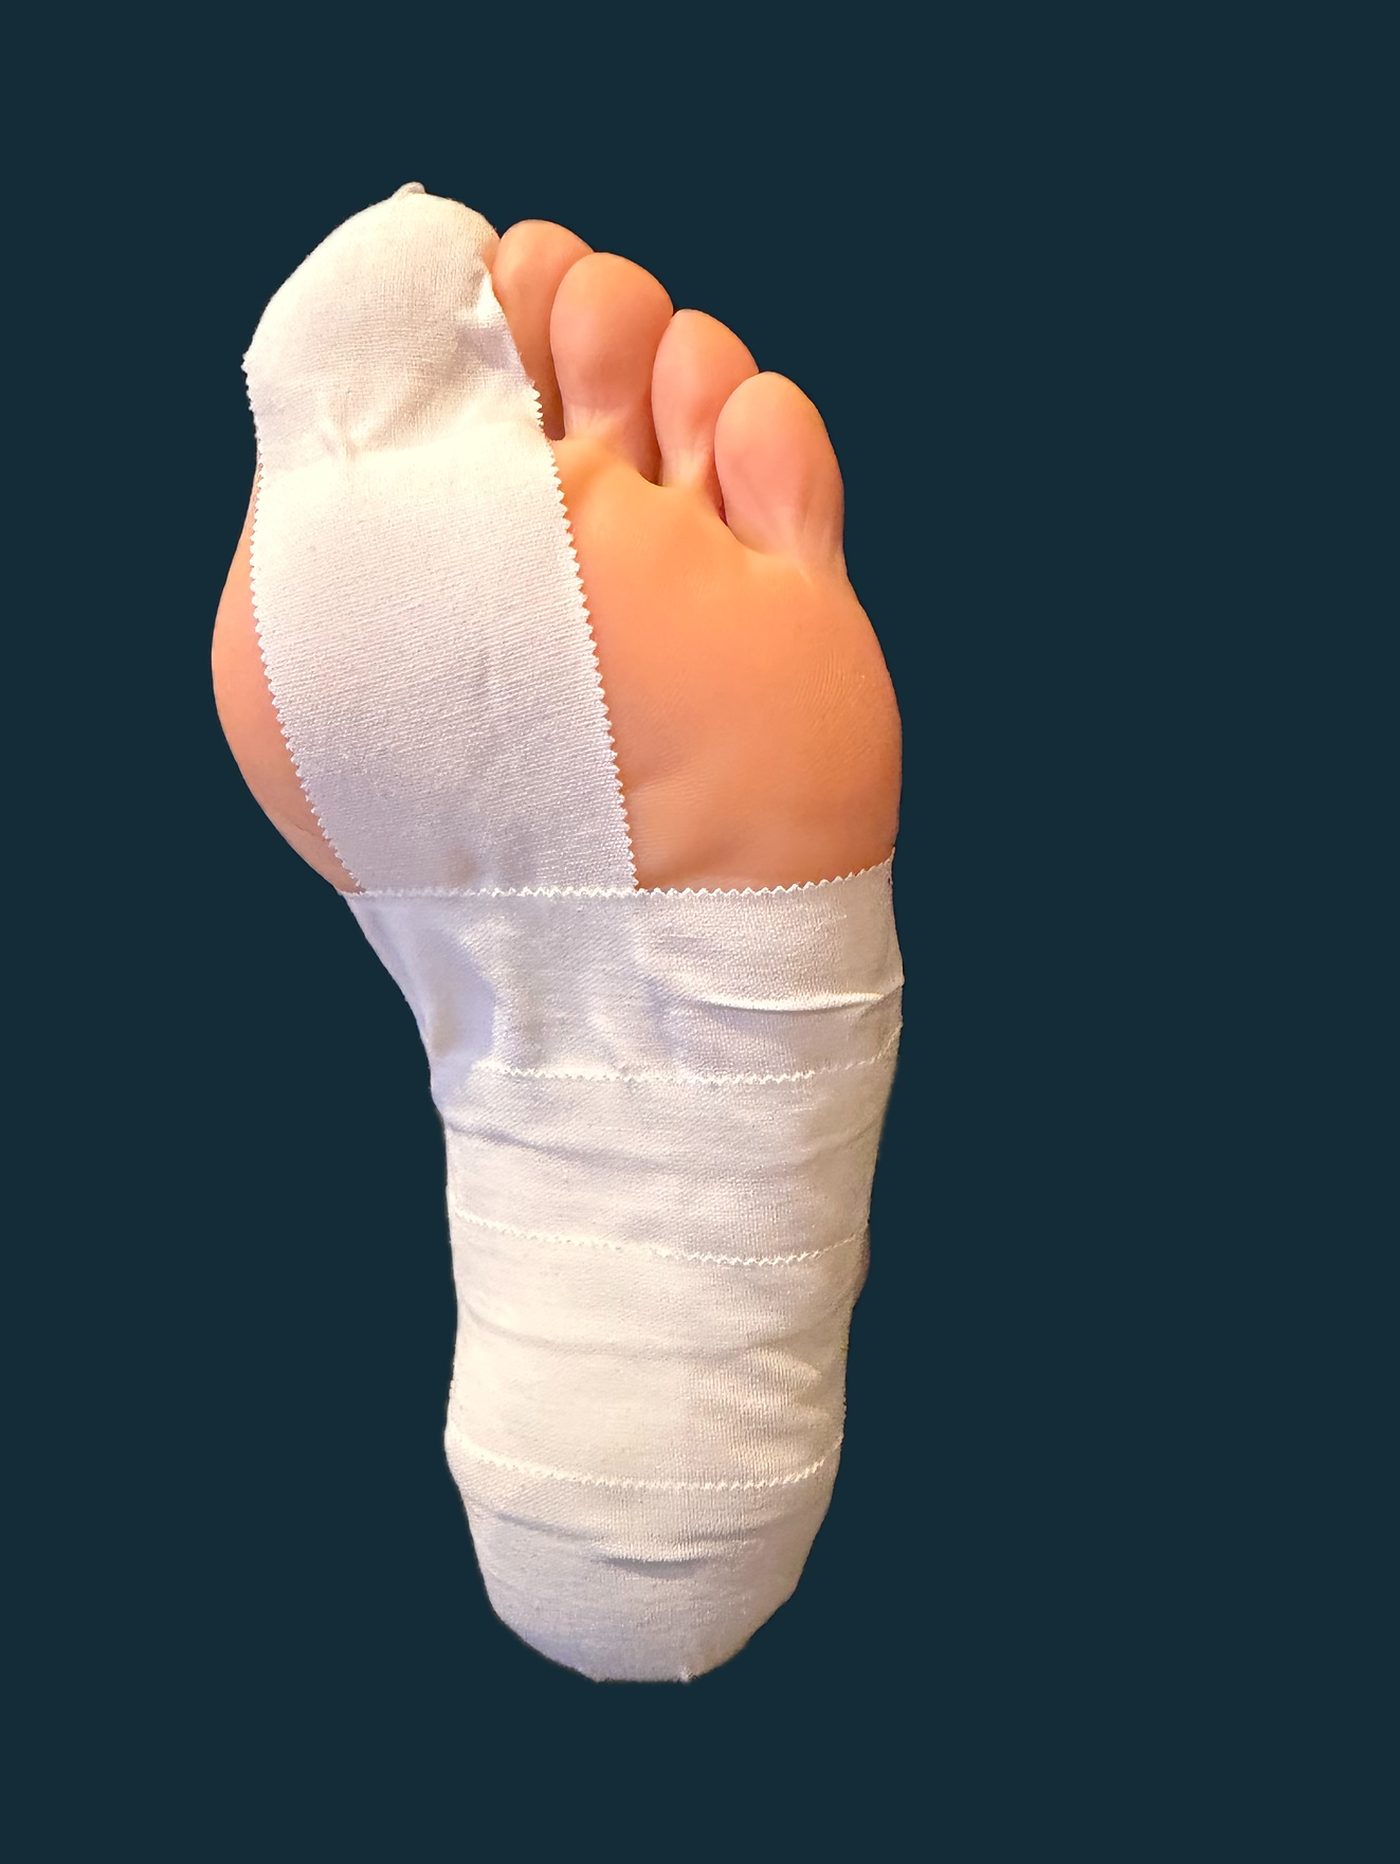
Photo 8. The heel is covered, and the toes and ball of the foot are still free.
Check before moving on
The number of strips depends on foot size and tape width. Keep the toes and ball of the foot free as shown. The tape should feel comfortable, without creases or tight bands.
Step 5: Secure the inside
Add a finishing strip on the inside of the foot.
Apply a strip along the inside (medial side) of the foot to secure the edges of the cross strips.
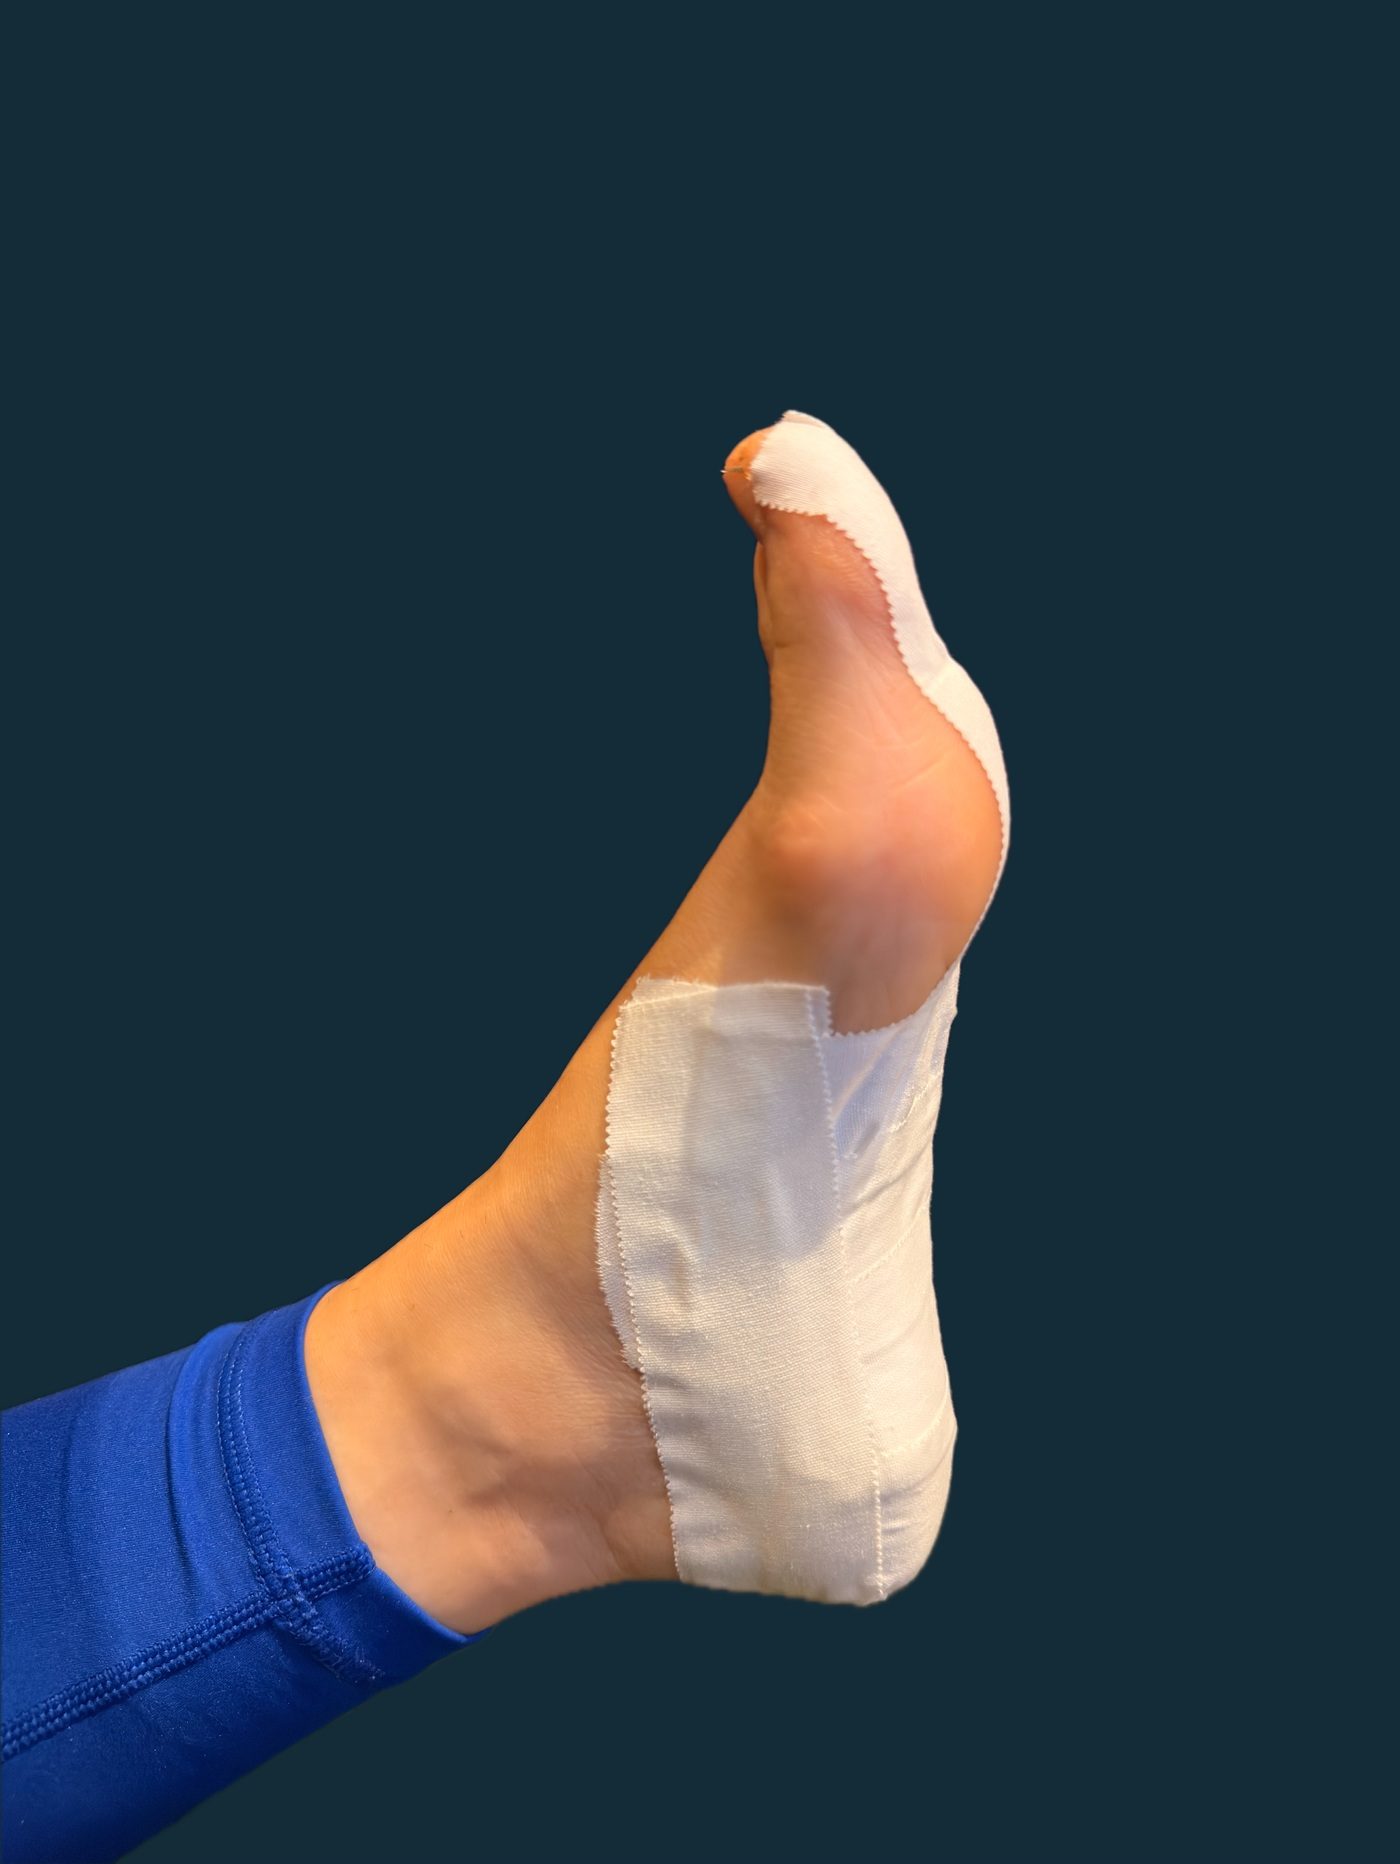
Photo 10. The inside finishing strip.
Step 6: Secure the outside
Apply a strip along the outside (lateral side) of the foot to secure the edges on this side.
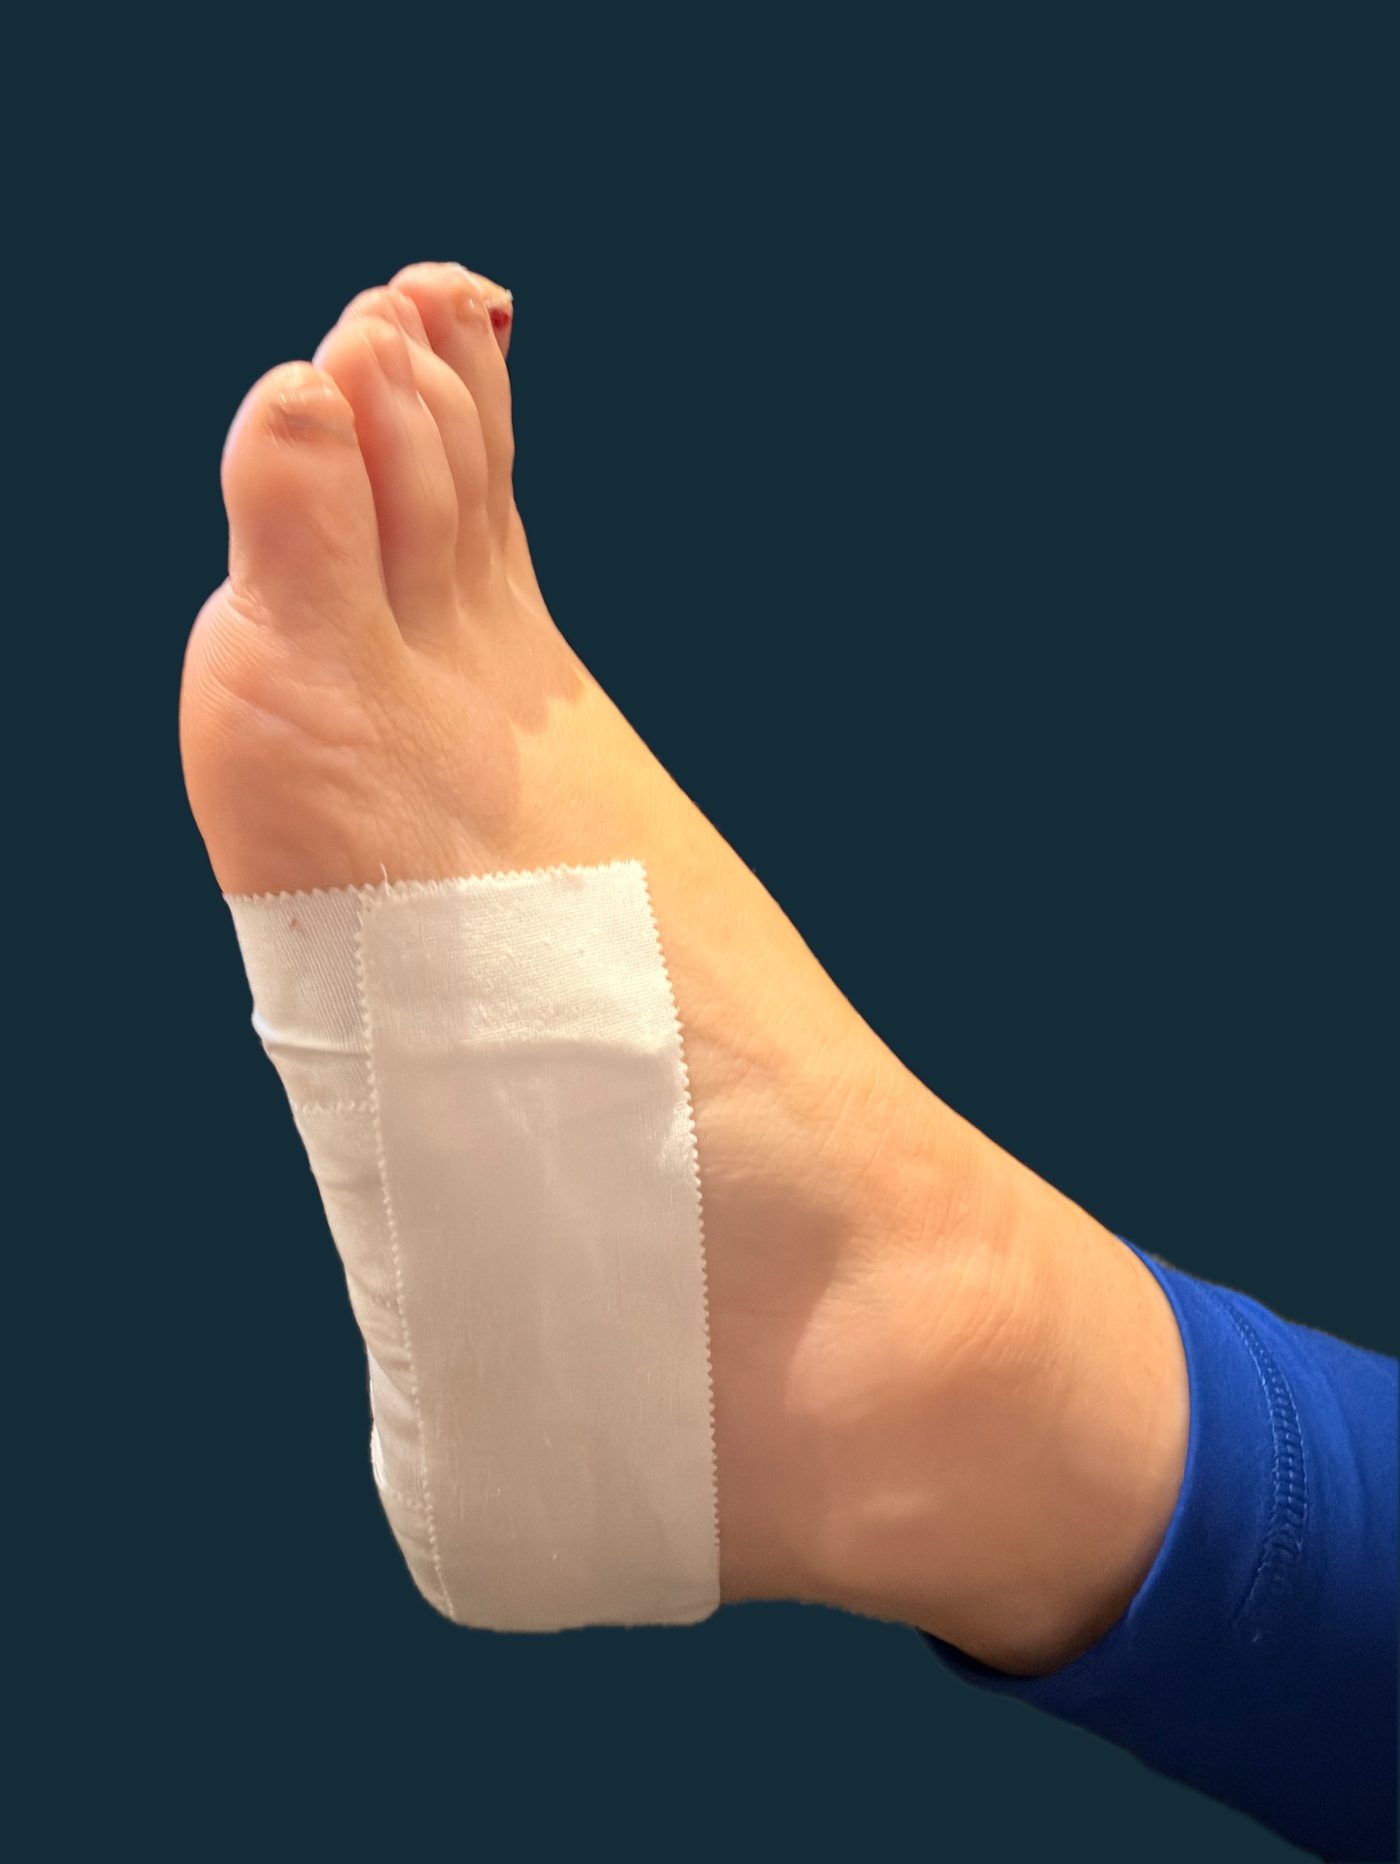
Photo 9. The outside finishing strip.
Press the edges down smoothly. Gently move the toes, then stand and take a few comfortable steps. Remove the tape if it increases pain or causes tingling, numbness, swelling, coldness or a change in toe colour.
Aftercare: wear, check and remove
Taping is one part of managing plantar heel pain.
Check comfort and skin
Remove the tape for itching, redness, blisters, pain or pins and needles. Seek urgent advice if numbness, coldness or colour changes persist after removal. Do not reapply over damaged skin. [2, 3]
How long to wear it
I recommend wearing the tape for the day and taking it off at night. Remove it sooner if it loosens, irritates your skin or stops helping.
Remove gently
A bath or shower can help loosen the adhesive. Peel slowly while supporting the skin; do not rip the tape off. Check and dry the skin before considering another application. [3]
Keep the wider plan going
Continue the exercises and footwear or activity changes agreed with your clinician. Seek assessment if pain is worsening, persistent or its cause is uncertain. [1]
When not to tape, and when to see a podiatrist
Do not tape over broken or irritated skin, or if you know you react to the adhesive. Ask your podiatrist first if you have reduced sensation, poor circulation, fragile skin or significant swelling. [3]
Remove the tape straight away if it increases pain or causes tingling, numbness, swelling, coldness or a change in toe colour. Seek urgent advice if numbness, coldness or colour changes persist after removal.
Seek assessment if you are unsure how to position or tension the tape, if pain is worsening or persistent, or if the cause of the pain is uncertain. References support general taping benefits and aftercare, rather than this exact variation.
Keep Building Your Understanding
Not All Heel Pain Is Plantar Fasciitis: Where It Hurts
Heel Pain in the Morning: Is It Plantar Fasciitis?
Stretches for Plantar Fasciitis: What Helps and How to Do Them
How Long Does Plantar Fasciitis Take to Get Better?
Can I Keep Walking with Plantar Fasciitis?
Sources & further reading
[2] Royal Orthopaedic Hospital. Low Dye Taping for Plantar Heel Pain.
This is general education, not a personal diagnosis or an individual treatment plan. Read our health information disclaimer.